Prerequisites
- An Ownstak account with a fully set up organization
- A static project built into a directory (e.g.,
distorbuild) - Node.js installed locally (version 18.x or higher)
Getting Started
Ownstak's static framework support allows you to deploy a wide variety of SPA/MPA projects, such as those built with:
| Framework | Description | Icon |
|---|---|---|
| Vite.js | React SPA, Preact SPA, Vue.js SPA, Svelte SPA |      |
| Docusaurus | Documentation site generator |  |
| VitePress | Static site generator for Vue |  |
| Create React App | React application generator | |
| Basic HTML | Simple HTML, CSS, and JavaScript sites |  |
1. Prepare your project
First, build your project so that it outputs all of your pre-rendered pages and assets into a single directory. The final output should look something like this:
- dist/
  - index.html
  - 404.html
  - assets/
    - logo.svg
    - app.js
2. Create ownstak config
Now it's time to create new project config, where you specify configuration for your static project.
You can do so manually or by running our wizard: npx ownstak config init
For static project, add following options:
-
For static MPA sites (e.g., Docusaurus), where not-found routes should return a 404 status, use the below config. It tells the OwnStak to serve the files from
distfolder at/.ownstak.config.mjsimport { Config } from 'ownstak';
export default new Config()
.setFramework("static")
.setDefaultFile("404.html")
.setDefaultStatus(404)
.includeAsset("./dist", "./") -
For static SPA sites (e.g., Create React App), where all routes should serve
index.htmlwith a 200 status, use following config.ownstak.config.mjsimport { Config } from 'ownstak';
export default new Config()
.setFramework("static")
.setDefaultFile("index.html")
.setDefaultStatus(200)
.includeAsset("./dist", "./")
If you're not sure what to configure for your framework, please see the examples below.
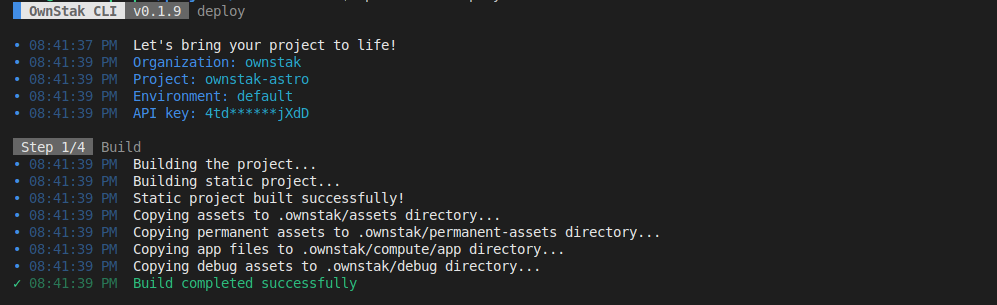
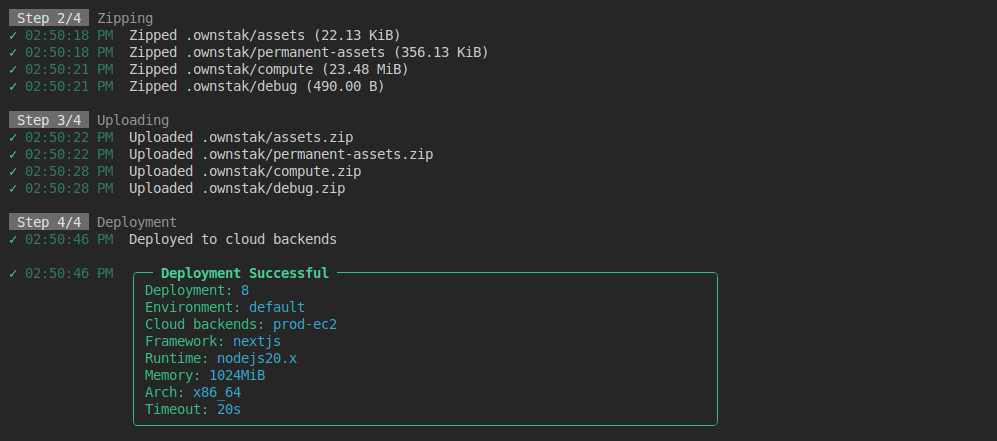
3. Deploy from your machine
Now, you can deploy the project from your machine by running:
npx ownstak deploy
When you run the deploy command for the first time, the CLI will guide you through the login and project configuration setup. Simply follow the instructions:


The organization and project names are stored in the ownstak.config.js configuration file for subsequent deployments, so you won't be prompted for this information again.
4. Deploy from CI
For CI and other non-persistent environments, you can skip the interactive deployment by providing the API key and other required options as command arguments.
You can generate a new API key for your account or project in the Ownstak Console under Settings > API Keys.
npx ownstak deploy --api-key=<your-secret-key> --organization=ownstak --project=ownstak-static --environment=default
5. Done!
Your project is now live and deployed to your organization's cloud infrastructure. You can visit and test it using the environment and deployment links provided in the output:
- Environment link – Always points to the latest deployment in a given project environment
Example:
my-static-app-development.aws-primary.my-org.ownstak.link - Deployment link – Always points to a specific deployment
Example:
my-static-app-development-10.aws-primary.my-org.ownstak.link
Local testing
If your project doesn't behave as expected, you can build and test it locally before deploying.
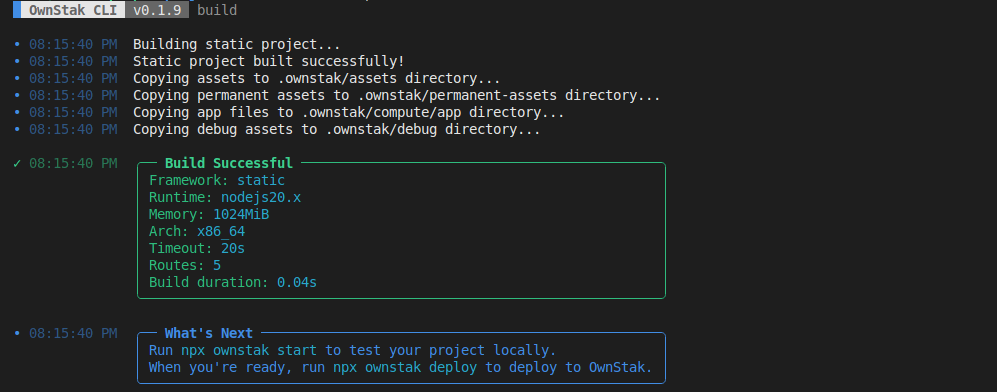
1. Build the project
Run the following command in your project directory to build your project without deploying it:
npx ownstak build
2. Start the project
Start the project and make sure it works for you locally with Ownstak:
npx ownstak start
When you see the ready message, you can visit http://127.0.0.1:3000 (or the different outputted URL) in your browser.
Custom response headers
You can customize HTTP response headers for your static SPA/MPA project using the setResponseHeaders() configuration option. This is useful for:
- Cache Control: Adjust caching behavior for different file types
- Security Headers: Add CORS, CSP, and other security headers
- Custom Headers: Set any custom headers for specific paths
Here's an example of how to set headers that will be applied to all paths:
import { Config } from 'ownstak';

export default new Config()
  .setFramework("static")
  .setDefaultFile("index.html")
  .setDefaultStatus(200)
  .includeAsset("./dist", "./")
.setResponseHeaders({
"Access-Control-Allow-Origin": "*",
"X-Robots-Tag": "noindex",
"X-Frame-Options": "DENY",
"Referrer-Policy": "no-referrer",
"X-Content-Type-Options": "nosniff",
"Referrer-Policy": "strict-origin-when-cross-origin",
"Permissions-Policy": "document-domain=()",
"Content-Security-Policy": "default-src 'self'; script-src 'self' 'unsafe-inline'; style-src 'self' 'unsafe-inline'"
})
If you want to apply headers to only certain paths, you can provide the path as a second argument.
The path can be an exact string path (/blog/), Express-style path (e.g., /assets/:path*), or a more complex condition object.
import { Config } from 'ownstak';

export default new Config()
  .setFramework("static")
  .setDefaultFile("index.html")
  .setDefaultStatus(200)
  .includeAsset("./dist", "./")
  .setResponseHeaders({ "Cache-Control": "public, max-age=31536000, immutable" }, "/assets/:path*")
  .setResponseHeaders({ "Cache-Control": "public, max-age=31536000, immutable" }, {
    method: "GET",
    path: /\.(css|js)$/
  })
Custom redirects
You can set up HTTP redirects for your static SPA/MPA project using the setRedirect() configuration option. This is useful for redirecting old URLs to new ones, maintaining SEO rankings, and ensuring users reach the correct content.
Here's an example of how to set up basic redirects:
import { Config } from 'ownstak';

export default new Config()
  .setFramework("static")
  .setDefaultFile("index.html")
  .setDefaultStatus(200)
  .includeAsset("./dist", "./")
  .setRedirect('/old-page', '/new-page')
  .setRedirect('/blog/legacy-post', '/blog/new-post', 301)
  .setRedirect('/docs/v1/:path*', '/docs/v2/:path*', 308)
Examples
Below are specific configuration examples for popular static site generators and frameworks. Each example includes the correct build command, dev command, and build output directory.
Vite (React, Preact, Vue.js, Solid.js, Svelte) SPA
Modern build tool for fast development and optimized production builds. Perfect for SPA applications. See full example project at GitHub: ownstak-react
import { Config } from 'ownstak';

export default new Config()
  .setFramework("static")
  .setBuildCommand("npx vite build")
  .setDevCommand("npx vite dev")
  .setDefaultFile("index.html")
  .setDefaultStatus(200)
  .includeAsset("./dist", "./")
Docusaurus
Documentation site generator by Meta. Ideal for creating comprehensive documentation with markdown support and versioning. See full example project at GitHub: ownstak-docusaurus
import { Config } from 'ownstak';

export default new Config()
  .setFramework("static")
  .setBuildCommand("npx docusaurus build")
  .setDevCommand("npx docusaurus start")
  .setDefaultFile("404.html")
  .setDefaultStatus(404)
  .includeAsset("./build", "./")
VitePress
Static site generator for Vue documentation. Built on Vite and Vue, perfect for technical documentation and guides. See full example project at GitHub: ownstak-vitepress
import { Config } from 'ownstak';

export default new Config()
  .setFramework("static")
  .setBuildCommand("npx vitepress build docs")
  .setDevCommand("npx vitepress dev docs")
  .setDefaultFile("404.html")
  .setDefaultStatus(404)
  .includeAsset("./docs/.vitepress/dist", "./")
Create React App
React SPA webpack builder with zero configuration.
import { Config } from 'ownstak';

export default new Config()
  .setFramework("static")
  .setBuildCommand("npx react-scripts build")
  .setDevCommand("npx react-scripts start")
  .setDefaultFile("index.html")
  .setDefaultStatus(200)
  .includeAsset("./build", "./")
Hexo
Fast, simple and powerful blog framework. Built with Node.js, perfect for creating blogs and documentation sites.
import { Config } from 'ownstak';

export default new Config()
  .setFramework("static")
  .setBuildCommand("npx hexo generate")
  .setDevCommand("npx hexo server")
  .setDefaultFile("404.html")
  .setDefaultStatus(404)
  .includeAsset("./public", "./")
Hugo
Fast static site generator written in Go. Excellent for blogs, documentation, and content-heavy websites with excellent performance.
import { Config } from 'ownstak';

export default new Config()
  .setFramework("static")
  .setBuildCommand("hugo --minify")
  .setDevCommand("hugo server")
  .setDefaultFile("404.html")
  .setDefaultStatus(404)
  .includeAsset("./public", "./")
Eleventy (11ty)
Simple static site generator that transforms data and templates into HTML. Great for blogs, documentation, and content sites.
import { Config } from 'ownstak';

export default new Config()
  .setFramework("static")
  .setBuildCommand("npx @11ty/eleventy")
  .setDevCommand("npx @11ty/eleventy --serve")
  .setDefaultFile("404.html")
  .setDefaultStatus(404)
  .includeAsset("./_site", "./")
MkDocs
Fast and simple static site generator for creating project documentation. Built with Python and Markdown support.
import { Config } from 'ownstak';

export default new Config()
  .setFramework("static")
  .setBuildCommand("mkdocs build")
  .setDevCommand("mkdocs serve")
  .setDefaultFile("404.html")
  .setDefaultStatus(404)
  .includeAsset("./site", "./")
Blazor
Microsoft's framework for building interactive web SPA UIs with C#. Deploy Blazor WebAssembly applications as static sites.
import { Config } from 'ownstak';

export default new Config()
  .setFramework("static")
  .setBuildCommand("dotnet publish -c Release -o ./output")
  .setDevCommand("dotnet run")
  .setDefaultFile("index.html")
  .setDefaultStatus(200)
  .includeAsset("./output", "./")
Next.js Export
Export Next.js applications as static sites. Perfect for JAMstack deployments with full static generation.
import { Config } from 'ownstak';

export default new Config()
  .setFramework("static")
  .setBuildCommand("npx next build") // with { output: 'export' } in next.config.js
  .setDevCommand("npx next dev")
  .setDefaultFile("index.html")
  .setDefaultStatus(200)
  .includeAsset("./out", "./")
Basic HTML
Simple static HTML, CSS, and JavaScript sites. Perfect for landing pages, portfolios, or simple web applications.
import { Config } from 'ownstak';

export default new Config()
  .setFramework("static")
  .setDefaultFile("index.html")
  .setDefaultStatus(200)
  .includeAsset("./public", "./") // folder with .HTML, CSS, JS... files